Using SI-Droid event equipment
Backwoods Orienteering Klub is now using SI-Droid for most events. The app runs on an Android tablet. SI-Droid reads SPORTIdent (SI) cards (aka finger sticks or dibblers) from a directly connected SI Readout station and prints results on a Bluetooth thermal printer. This guide explains the equipment and the features of SI-Droid for BOK meet directors. This article is divided into the following sections:
- Equipment
- Using the equipment
- SI-Droid overview
- Event settings
- Courses
- Readout and competitors
- Before the event
- Day of the event
- Posting results
This article was updated in March 2025 to reflect changes applicable to USB-C tablets and printers.
Equipment
The equipment BOK uses is divided into three groups:
- Required equipment for gathering results
- Optional equipment for live results display
Basic meet equipment
The minimal required equipment to use SI-Droid with modern equipment to run an event is illustrated below:
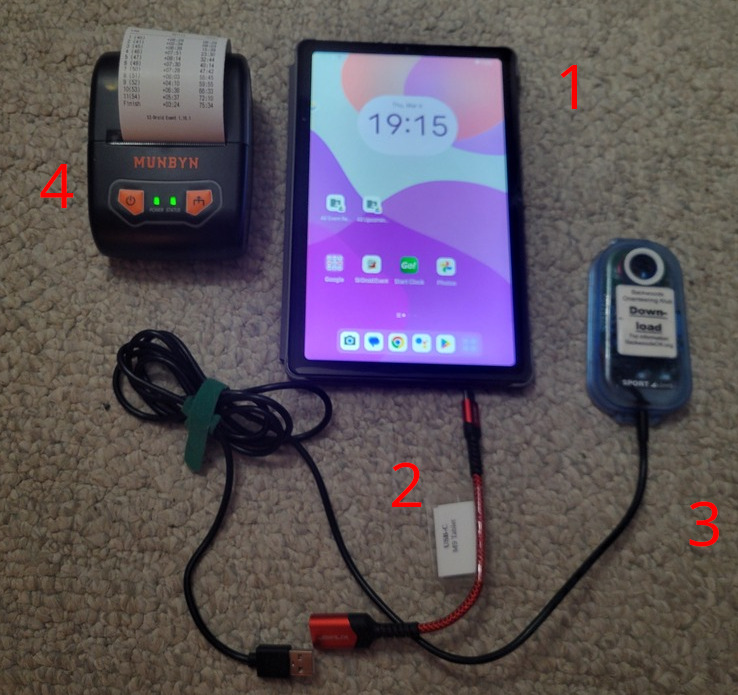
The individual pieces are:
- Android tablet or phone running SI-Droid Event software. We use a Tab M9 (9″ MTK) running Android 13
- USB C male to USB-A female Adapter. We use a JSAUX one which has a short cable as we feel this puts less stress on the connectors in the field where usage might be rougher than at home.
- A SportIdent redout station. We use a BSM8-USB station as illustrated.
- A Bluetooth thermal receipt printer. We use a MUNBYN IMP002 that uses USB-C chargiing. This model is cheaper than the previous generationIMP001 that had a dedicated charger. This printer uses 2 1/4″ x 50′ (58mmx15m) thermal paper rolls such as Staples Item # 816613. Expect perhaps 100 printouts from each roll. If you buy longer rolls, such as 85′ (e.g. Staples Item # 472872) which may be more readily available in smaller quantities, you will need to divide them into two smaller rolls. Pull the new part tight every few feet as you rewind it and you will end up with two nice rolls of acceptable size for the printer.
Nice to have equipment
Having an Android tablet or phone with USB-C charging allows you to charge it while also downloading results at a meet. To do this you will need a USB-C hub and either wall power or a power bank. We use a UGREEN Revodok 105 USB C Hub. We tried a cheaper one that did not work, so pick a reputable brand. You need a dock with a USB-C input that can be used for charging. Plug the dock cable into your tablet or phone and your power supply USB-C cable into the USB-C input power port on the dock. There will likely be a small LED on the dock to indicate if it is getting power through the USB-C input port.
You can charge from a wall outlet if you have one at your event site, or you can use a portable charger (aka power bank).
Older equipment differences
If you have older equipment there are some differences to consider.
- If your tablet or phone has a micro-USB adapter you will need an On-the-go (OTG) cable that allows the tablet or phone to connect to and control external USB devices such as a thumb drive or a SPORTIdent (SI) control station. These are readily available in a variety of forms. We used one from Cable Matters for several years. These do not support charging your tablet or phone at the same time.
- A USB-serial adapter if you are using a serial SI BSM7-D Serial RS-232 readout station. Not all such cables seem to work. We use a TECHTOO USB 2.0 to RS232 DB9 Serial Cable Female Converter Adapter with Prolific PL2303 Chipset.
- Bluetooth thermal receipt printers such as MUNBYN IMP001 one works similarly to the IMP002, although they cost more and have a dedicated single-purpose charger.
The printer and tablet each have chargers in the equipment box. I have labelled them and the connectors are different – round for the printer and micro-USB for the tablet. When fully charged, both have ample power for a typical meet.
Optional equipment for live results display
The equipment needed to display live results at an event is illustrated below.
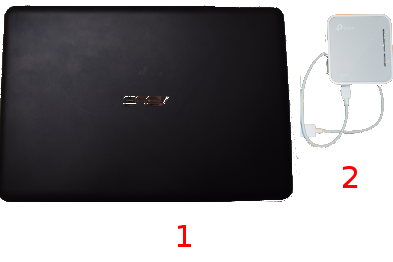
- Laptop computer (ASUS X205TA with 32GB solid state drive). This particular computer does not support Windows beyond windows 10, so you should look for a laptop capable of supporting Windows 11. Many cheaper ones come with Windows 11 in S mode, so if you also want to use non S-mode supported software, either take it out of S mode or get one that has full Windows 11 capability, so you can run software such as SportIdent Config+, Open Orienteering Mapper, Condes, or Purple Pen for example.
- Travel router (TP-Link AC750 Wireless Portable Nano Travel Router)
Using the equipment
Tablet basics
When viewed as in the equipment illustration:
- USB-C port for charging or cable to attach to readout station is on the lower center. Make sure your tablet is charged before the event. Without the optional dock mentioned above you cannot charge and download at the same time. Fortunately the battery int he tablet we now use lasts quite a while.
- Power switch is on the right side in the middle.
- Volume up/down rocker switch is on the right side above the power switch.
- If the screen is locked when you press the power button you will need to first swipe from bottom to top, then enter the pattern to unlock the screen. If you have just powered on the tablet you will also need to enter the password. Details inside equipment box lid.
- Find more details in the Lenovo Tab M9 User Guide.
The tablet is set up for gesture navigation
- Swipe up from the bottom of the screen to return to the home screen.
- Swipe up part way and hold to see the currently running apps. Tap one to switch to it or swipe an app up off the top of the screen to close it altogether.
- Swipe left or right on the screen to switch between runnning apps.
Is someone has switched the setting to use 3-button navigation, there are three on-screen buttons at the bottom of the screen.
- Back button: ◁ Tap to return to the previous page.
- Home button: ◯ Tap to return to the default home screen.
- Recent button: ⧠ Tap to view recent apps.
Swipe down once from the top of the screen to access the settings (gear) icon, or some quick setting such as connecting to the Internet over your home Wi-FI.
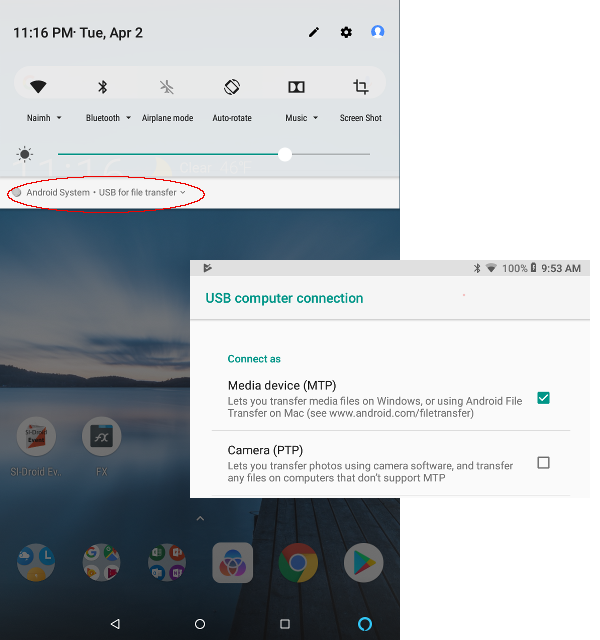
You can transfer files by email or over a USB cable. Gmail id is listed inside the equipment box cover. If you connect a USB cable to your computer, swipe down twice to see the Android System – USB stratus. Tap the status to show more settings. Connect as Media Device (MTP) for your computer to see the tablet’s files. See the illustration below.
You will mostly use the Download folder which is directly accessible from the device’s Internal Shared Storage folder. You can also share files through email if you are on a WiFi network (the tablet does not have cell phone capability), but you can set up a mobile hot spot if needed to transmit results after an event. The Gmail account names is also inside the lid of the equipment box.
Printer basics
BOK now has two small Bluetooth thermal printers. printers. The primary printer is a newer MUNBYN IMP002 printer which has a single USB-C connection for both charging and, if needed, printing from windows via a USB cable. The second is an older Welquic one whose battery lasted us 8 years before needing replacement.
MUNBYN USB-C printer
BOK’s primary printer is a MUNBYN IMP002 portable thermal printer with a single USB-C port that can be used for charging or printing. For use with SI-Droid, printing is done via Bluetooth. The printer is shown below:
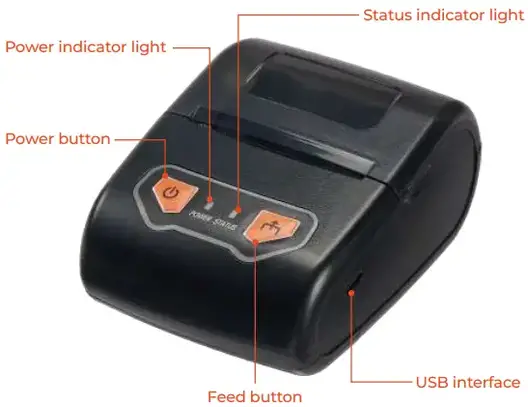
To turn on the printer, press the power button (left button) for two seconds until you hear two beeps. To turn off, hold it for two seconds until you hear one beep. The power light and status light will both be solid green when the printer is on and connected, that is, ready for printouts.
The tablet is configured to automatically establish a Bluetooth connection to the printer. Use the tablet’s Bluetooth settings to verify that you have the correct printer connected or to switch if necessary. Both printers are in the list of known Bluetooth devices.
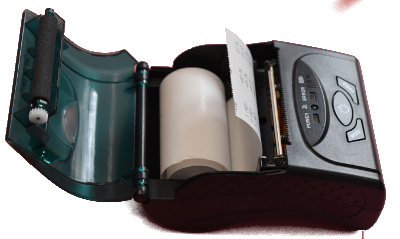
To change paper:
- Pry open the lid from the grooves on both sides and then open the lid.. If on, the printer will beep.
- Remove the old roll, noting its orientation.
- Place a new roll in the printer bay with the paper feeding from the bottom and up through the opening at the front of the lid as shown in hte image below.
- Close the lid. The power status will light again.

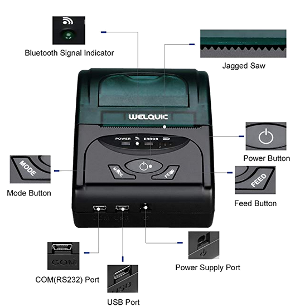
Welquic printer
BOK’s backup printer is a small Bluetooth connected Welquic thermal receipt printer. Press the power button (middle button) to turn on the printer. Press and hold it a few seconds to turn off the printer. When you turn on the printer a three bar LED set on the right will indicate battery status. After a moment or two this will start flashing periodically giving a visual indication that the printer is on. The printer buttons, connectors and indicators are shown below.
By default the tablet will connect automatically to the MUNBYN printer. Use the tablet’s Bluetooth settings to verify that you have the correct printer connected or to switch if necessary. Both printers are in the list of known Bluetooth devices.
Note the location of the jagged saw cutter. Paper tears best if you pull it toward the front of the printer and then tear it. It does not tear well if you don’t pull it forward first.
To change paper:
- Use the finger tab depression in the printer lid to gently lift up the lid to open it. The hinge is at the back of the printer.
- Remove the old roll, noting its orientation.
- Place a new roll in the printer bay with the paper feeding from the bottom and up through the opening at the front of the lid.
- Close the lid. The power status will light again.
Please don’t mess with the Mode button or you will need to figure out how to get it back to Bluetooth!
Travel router basics
The low-cost travel router provides a local Wi-Fi service in the woods. As configured for our use it has no Internet connection and serves only to allow local wireless connections. It has been configured with an SSID of BOK-Results. No password is required to connect. Make sure to connect the micro-USB end of the white cable to the micro-USB port on the router and the USB-A (large) end to a USB port on the laptop. The router will power on automatically and provide Wi-Fi after a minute or two and the green LEDs will light up. If this does not happen, make sure that the laptop is turned on as it is the “battery” providing power for the router. Next check that small end of the USB cable is the one plugged in to the router and the large end is plugged in to the laptop.
Laptop basics
We use a basic Windows laptop so we can also do things such as reconfigure SI cards in the field. However, any device with a browser will serve this purpose. For live results display, the laptop only needs a browser and a USB port that can power the travel router. Make sure you charge the laptop before going to an event.
The tablet is configured to run SI-Droid Event results service using port 8080. The router has a reserved IP address of 192.168.0.110. So the results are available at URL
http://192.168.0.110:8080/reports/SimpleResultsHTML?refresh=10
The “refresh=10” refreshes the results every 10 seconds. Phones or other nearby Wi-Fi capable devices can also connect to BOK-Results and use this URL for results display. Note: Mobile phones may need to turn off mobile data to connect to this URL as there is no real Internet service behind it.
After you start the tablet it should automatically connect to the BOK-Results network. The same is true for the laptop .
To make life easy we have configured a shortcut icon the the Desktop of the laptop and also placed it in the task bar. The icon is a gray square with a “1” in it and it looks like:
Click the icon and it will open the Chrome browser at the above URL. Once you have some results downloaded into the tablet your screen should look something like this:
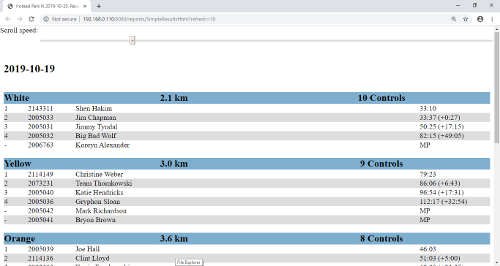
Once the screen has filled with results, the display will automatically scroll slowly up to the top and then back down to the end.
If you connect the tablet or laptop to your home network, you may have to change the connection settings to explicitly select the BOK-Results network as the tablet and laptop will probably prefer a network with Internet connection and BOK-Results will not have Internet connectivity. You should check the connection settings first if things don’t work as expected.
SI-Droid overview
SI-Droid Event is event management software that supports both cross-country and score orienteering events. A no-charge Lite version allows you to test your hardware and make sure it works and also get a feel for some of the app features. The SI-Droid Wiki has documentation and tips. Refer there if you need more than this basic introduction.
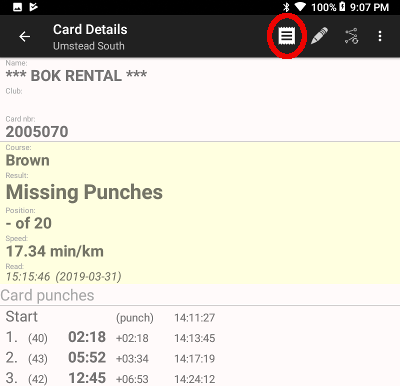
Tap the icon on the tablet home screen to launch SI-Droid. The app has three basic sections, courses, readout, and results. The app opens in the readout section. The top of the screen looks like the image below:
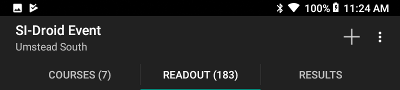
The event name is shown on the left. The three sections are shown across the screen. The parenthesized numbers beside Courses and Readout show the number of defined courses and the number of SI cards read. A context-sensitive menu ( ⋮ ) is available on the right. The + icon allows you to add courses or runners to the event when you are either of those sections.
Event settings
Setting up your event in SI-Droid is quite easy. The steps are:
Erase any existing event
Use the 3-dot menu to open the Manage DB setting and then choose Erase all event data…. .
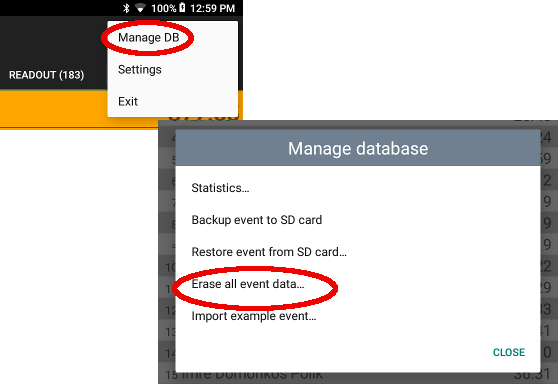
After you confirm deletion, you are ready to start your new event.
Enter new event information
From the 3-dot menu open the Settings dialog.
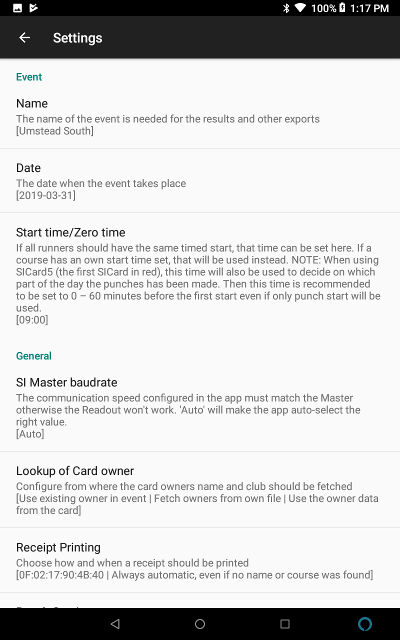
Enter the event name and date. Start time/Zero time provides a start time for runners who did not punch a start control and also for some older SI cards that operate in 12-hour time. Unless you need it to be accurate for a mass start, I generally set it for two or three hours before the official start time to allow for any early starting runners.
The general settings are all set up so that the system works together when you connect the parts together and turn on the tablet and printer. Please don’t mess with them unless you have a very good reason! The one exception is the Lookup of Card owner. I’ll cover that in a moment.
Enter course details
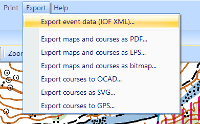
Tap on the Courses item at the top of the screen. You can now enter a new course by tapping the + icon. Much faster is to use the 3-dot menu to import courses that you have saved from Condes course setting software. In Condes select Export->Export Event Data (IOF XML)… and then choose the courses to export.
Take the defaults and save the file. Either email the file to the tablet, open the email in Gmail, and save the XML file attachment in the Download folder. Or transfer it from your computer over the USB cable.
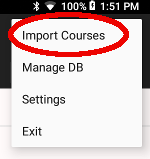
On SI-Droid, use the 3-dot menu item Import Courses and select the XML file you just downloaded. I often prefix my file name with an international format date such as 2019-03-31 which makes it easier for me to find. Note that the Import Courses selection is only available if you are looking at the Courses section.
Tap a course to view details of that course.
Courses are typically imported in alphabetical order rather than difficulty level order. Tap and hold a course to open a context menu that will allow you to move the course up or down as illustrated below.

Readout and competitors
This is the screen you will see most during an event. In the Settings dialog I have set up the system to recognize the SI Master at either of its supported baud rates and to automatically connect to the Welquic printer. I have also enabled automatic printout of results. So it is about as easy as connecting up the download box to the old serial printer and turning on stuff and it just works. The major improvements are:
- SI-Droid matches a runner against a course and includes the course in the printout
- SI-Droid indicates whether the runner mispunched or otherwise failed to complete the assumed course.
- The printer is faster than the 4800bps SI printers.
- SI-Droid can look up the information from a file that matches SI cards to runner names and organizations (school, club, etc.).
Let us deal with the last of these items first as it’s part of the setup you might want to do. If you don’t have any other source, then SI-Droid simply uses whatever data is in the SI Card, just as the old system did. Otherwise you can provide another source of possible runner lookup. For our purposes I will only consider runner lookup from a file on the tablet.
There are four basic reasons that you want to provide card data:
- A club member has an old SI card that does not include his or her name. These cards usually have a number less than 2,000,000.
- A runner bought a card from a source other than BOK and it has not been customized to include his or her name.
- A JROTC or other group owns a set of SI cards and assigns them to individuals or teams for the event.
- A runner is using a BOK rental card for which the name shows up as *** BOK Rental ***.
We don’t yet have any master list of members in categories 1 or 2, so most meet directors have at least a partial list in the old SINames.txt format. used by SIDResults.
Card Number,Name of Owner,Club.External-id,Course
Club, External-id, and Course are optional. Club is useful for groups. For example, I use WCHS for West Carteret High School. Course is useful for competition events where you have full pre-registration information. Open your existing club member CSV file in a spreadsheet (Excel, OpenOffice Calc, etc), ad open the submitted preregistration sheet in another window. Copy the SI card column and name colum info to your names spreadsheet. Optionally enter a club name in column C and fill down. Repeat for each submitted preregistration. Save the file as .txt or .csv and email it or transfer it to the tablet, saving it in the Download folder on the tablet.
Use the 3-dot menu on SI-Droid to open the Ssettings dialog and scroll down to select the Lookup SI Card owner item. If Fetch owners from own file is not checked, tap to check it. Once checked, tap File with card owners to select the file you downloaded. If you do not have a file, uncheck Fetch owners from own file so you will not inadvertently assign incorrect names to finger sticks that may have been assigned for another event.
One final note on competitor names. You will probably check the first two lookup options – .Use existing owner in event and Append race number to existing owner’s name. If you are not using a file you will definitely want these options. However, if you are running a multi-day event and using rental sticks, either make sure that you do not use the pool of sticks used on day 1 again on day 2, or uncheck the fist option.
Before the event
- Prepare and download your course file (XML) from Condes as described above, rearranging course order as desired.
- A few days before the event, check that you have spare 2 1/4″x50′ thermal paper rolls for the printer. You need a minimum of two spare rolls of thermal printer paper. Each roll will do approximately 100 downloads. Contact Ian or buy more if needed.
- Check that you have enough registration forms in the meet bag.
- The day before the event, charge the tablet, club laptop and all the printers. Connect tablet and laptop to your home WiFi to allow them to update.
- Connect the tablet to the SI Master as described above and turn on the printer. Punch any SI Card to make sure that the setup works.
- If you plan to use live results, connect the travel router to the laptop while you still have SI-Droid Event running on the tablet. Connect both the tablet and the laptop to the BOK-Results Wi-Fi network and check that you can launch the results display on the laptop as described earlier under Laptop basics.
- Power off the tablet, laptop and all printers. You want maximum battery power available for the event.
- Prepare a preliminary names file form existing club member names and preregistration information and download it to the tablet.
Day of the event
Set up the equipment again and power it all on. Do another test punch to make sure that everything is working. Delete any test readouts and you are ready to go. The system will usually stay in the Readout section, although you can look at other sections without interfering with ongoing downloads.
As runners finish, they put their SI cards int he SI Master control and the tablet screen comes to life,SI-Droid assigns a course based on the completed controls and prints the results.
The last runner to punch will show with an orange background and be at the top of the Readout screen.
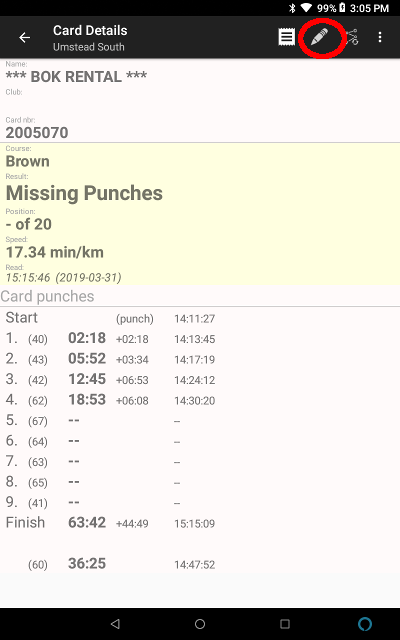
If the printer runs out of paper, reload paper as described in the printer basics section above. If you need to reprint results for the last runner or last few runners, simply tap on a runner in the Readout section and then tap on the print icon at the top of the screen as shown below.
The two icons to the right of the print icon allow you to edit the runner details to assign a specific course if SI-Droid did not pick the correct course for the runner. You can also edit the runner name for rental sticks or groups such as JROTC if you did not have an advance list of names for the lookup file. More details below. While you can do this during the event, you will more likely need these capabilities when you are preparing the final results for posting. So I include some more information in the next section on results.
Posting results
Once the event is over you need to prepare the results. The main task is to assign names to the rental SI cards. Sometimes others will run as a family on a member’s card, so you may have other names to update too. This is also where you can do things such as:
- Delete runners who did something like clearing the card before downloading.
- Assign an actual start time to someone who did not punch start. (Note: this works in theory but doesn’t seem to work well in practice).
- Make any other edits necessary to individual runner information or punches. I suggest you use the 3-dot menu to Manage DB and save a copy of your event before you mess with it.
As of the date of writing, you need to update the names on the tablet. It would be convenient to be able to update the names file you prepared before the event and download it again, but SI-Droid does not currently appear to reread names once a name has been assigned to an SI Card or start.
Tap on a runner in either the Readout or Results section and you will see a dialog like the following:
The Results section will scroll to the end as soon as you return to it. from an edit, and the Readout section displays the SI cad number which the Results section does not. Personally, I like to share the results and save or email them to my computer, as described below, so I can open the HTML file and search easily for SI Card numbers.
Tap the pencil icon to edit the runner, or the course icon to its right if you need to edit the assigned course. When you edit the runner, tap in the name field (for example, *** BOK Rental ***. Your screen will look something like:
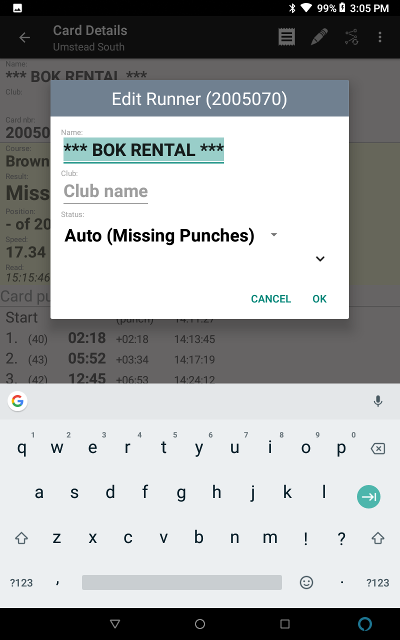
Type in the name you want and tap OK. Repeat until all runner names have been entered. Note that there is no warning if you accidentally cancel out of the dialog and I find it easy to do!
Saving and uploading your data
When you are ready to post the results on the BOK web site, you first upload the results and splits as HTML files. As with other transfers, use email or a USB cable. Tap on the Results section and then tap on the Share icon as shown below:
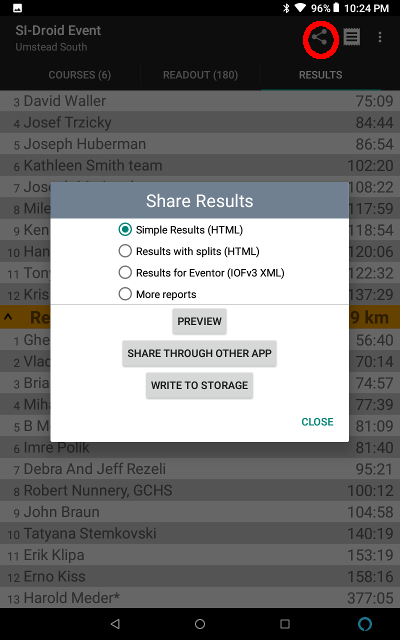
You can preview the results using the Chrome browser, write them to storage (default Download folder) for transfer over a USB cable, or share through another app such as email. Connecting to a mobile hot spot is quick and efficient if you need to hand the meet gear off to someone else right after the event.
BOK also needs the number of unique cards used for the event for the insurance provided through Orienteering USA. A simple way to get this is to use the three-dot menu options to Manage DB (as described in Event Settings above) and select the Statistics… option as shown below:
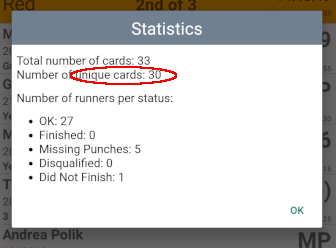
If you want to take a screenshot and transfer or email it to yourself you can take a screenshot by pressing the power button and volume down rocker simultaneously. This may take a little practice to get right.
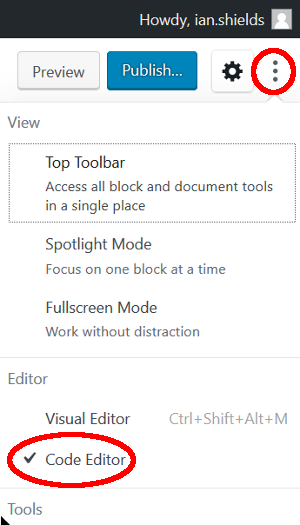
Once you have the results on your computer, you need to incorporate them into a results posting on WordPress. Prepare your results posting and then switch from visual editing into code editing. Do this using the 3-dot menu at the top right of your WordPress screen as shown below:
Scroll to the bottom of the HTML code window. Open the results.html file that you uploaded in a text editor. Strip out the top of the file down to the first occurrence of <table (probably about 17 or 18 lines down). Scroll to the bottom and remove the final </body></html>. Now mark all that remains and copy and paste it into the WordPress editor. Be patient! WordPress can take a few minutes to absorb all the new HTML. Once it is all in, repeat the process for the splits. You can now switch back to visual editing if you wish. Check your post carefully and tag it as event results and latest news. Then publish it and you are done.
Contact me with any questions or post a comment and it will get to me.
Ian Shields